Excel® is a robust computer program for multiple tasks, from creating personal budgets and supplemental accounting documents to troubleshooting accounting software and even programming some software. With all that it offers, many of us still only use a fraction of its features. This series — Excel Pro Tips — covers some of the best formulas, tables, conditional formatting, and other processes to benefit users. Today’s article looks at the use of Data Validation to keep inputs consistent.
Background
A critical part of building any financial record-keeping device is consistency. At first, you might not think too much about it. As long as I have the expense recorded, that is all that matters, right? What happens at the end of the year when I start to search for individuals I need to send a 1099? Some entries list “John S. Trucking” while others list “Smith Trucking?” Together they require a 1099, but formulas such as sumif will not know that all of these are one in the same. This is just one example of many pointing to the need for consistency. Excel has a great tool to help with that, and it is called Data Validation.
Data Validation
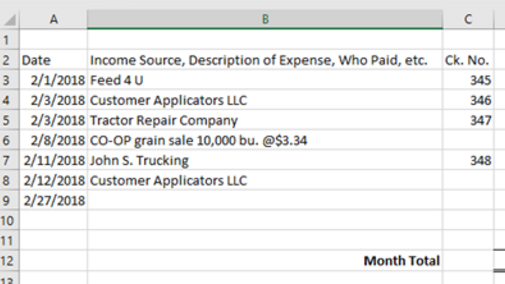
Say we have a standard ledger we use to track expenses and income (Figure 1).

Figure 1. Consistently naming entries can be made easier using the Data Validation function in Excel.
As long as we do not hit a wrong key, Excel will autofill the column B if there is another instance of the first few letters typed above. What if we hit a wrong key, or if we type in a completely different name? Then, there is a problem. The solution is data validation. With data validation, only specific entries will be allowed to be entered.
To start with you will need to make a new sheet in the workbook. This will be the master input for all new vendors. In column A1 type Vendor/Income Source Name, which is just a label to remember what it is. In A2 type the first business or person you want to add. Continue down Column A, adding all the businesses with whom you have transactions.
Now for the data validation part. Go back to the ledger and highlight each cell in Column B that you want to have a validation requirement. In the Excel ribbon click on the Data tab. Under Data Tools, click on Data Validation. A drop-down box with options will appear. Click on the first one called Data Validation. In the pop-up window, you will need to change a few things. First, the Allow will need to be switched from any value to List. Then, for the Source, we’ll want to reference the cells from the other sheet we made with the vendor names in Column A. Leave some additional blank cells in Column A to allow for future additions.
To get fancy, click on the Error Alert tab and change the Style to Warning. Then click OK. What you will find is Column B on our ledger sheet now has a drop-down list where the vendor name can be selected. You also can type the name in as before without using the drop-down list. However, if a name is not on the list or is spelled differently, the warning message will pop up.
The warning will give you four options. The first two are the important ones. If you do not want to add the vendor to the Master List on the other sheet, you can hit Yes to force your input into the cell. If you have a typo in the name or want the vendor entered into the Master List click No. Then either add the vendor to the Master List and re-enter the transaction on the vendor sheet, or correct the typographical error.
One last note: You can always go back into Data Validation to adjust the source formula or change any of the other features.
Give this a try, and email me with topics for future articles.

